How to bind IP Address and MAC Address on TP-Link Router
Note: the IP Address on your computer should be set as a static one and the DHCP Server on the computer should be disabled. Click here and know how to configure TCP/IP Properties on your computer.
Step 1 Open the web browser and type the LAN IP address of the router in the address bar, the default IP address of the TP-Link router is 192.168.1.1, and then press Enter.

Step 2 Type the username and password in the login page, the default username and password both are admin.
Step 3 Click IP & MAC Binding->Binding setting on the left page.
Step 4 Select Enable ARP Binding, and click Save.
Step 5 Click ARP List on the left page, you can see ARP table the router learns.
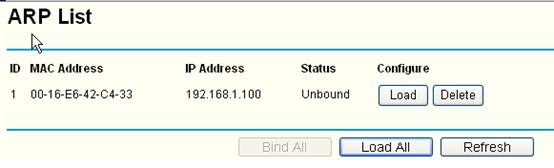
If you can confirm the ARP table is correct, please click Load Add and Bind All, then all IP Address and MAC Address of your computers showed on the ARP table will be binded.
But if you can't confirm the ARP table is no problem, please add IP Address and MAC Address of your computers manually.
(1)Click Add New to set IP & MAC Bingding.
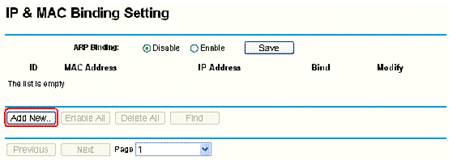
(2) Enable Bind, and type the MAC Address and IP Address of your computer,

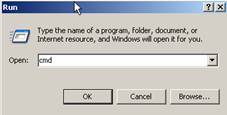
You should know the MAC addresses of the computers which you would like to allow them to access the Internet.You can check them on the computers with command prompt.
(1)Click Start->Run, type cmd and press Enter.
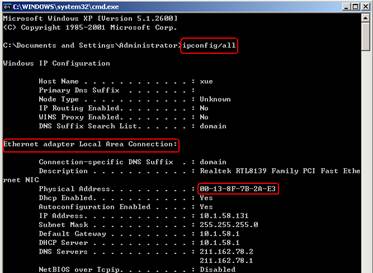
(2) Type ipconfig/all at the prompt window, press Enter, it will show the MAC address and other address information of this computer.
Step 6 Click Save to save the settings.
Suitable for: TL-R470T+ V2, TL-R480T+ V5, TL-ER5120,TL-ER6120
.jpg)
Is this faq useful?
Your feedback helps improve this site.
14.0-A_normal_1584497163963a.png)
6.0-A-2000px_normal_1584497345873p.png)
3.0&4.0-F_normal_1584493102128p.png)
TP-Link Community
Still need help? Search for answers, ask questions, and get help from TP-Link experts and other users around the world.